Converted Envelopes
Full Bleed Available
Printed on 70# Offset or 24# Classic Crest
Several Paper Types to Choose
Compatible With Laser and Ink Jet Printer
To Order Converted Envelopes Please Call or Email for Quote.
Call us at 888.288.7518 or email us at [email protected].
Minimum Order Quantity must be 2500 or more for Converted Envelopes.
If you’re looking for smaller quantities, please click here to visit our other envelope pages.
Contact Us
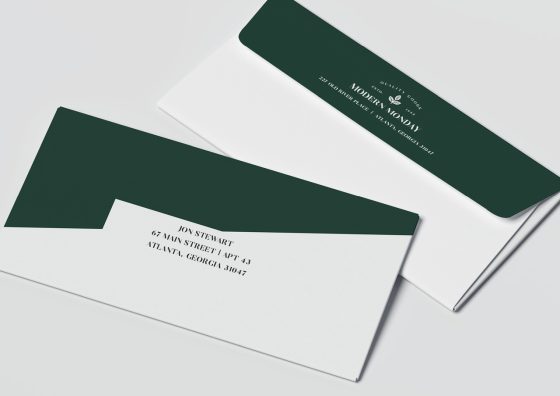
Converted envelopes are printed on an offset printer using sheets and then converted into envelopes by die-cutting, folding, and gluing. As a result, converted envelopes are more customizable and can include special dies and printing from edge-to-edge (known as full bleed).
Have any questions? Feel free to call us at 888.288.7518, use our chat service, or email us at [email protected].
Converted envelopes are more customizable. Please contact us to get a template.
You can upload your own custom design and see a live preview. You approve, we print and deliver.
Guidelines To Go By
We want to make sure your print project goes how you envision it. Be sure to use our layout guides to ensure your file(s) is set up correctly for best printing results.
Color Mode
CMYK is preferred and recommended. If you upload your file in RGB color mode it will be converted to CMYK and the final product could end up differently than expected.
Resolution
Files are preferred to be at 300 dpi for best print quality. Files lower than 300 dpi could result in “pixelation” of images.
File Types Accepted
We prefer PDF files but also accept PSD, JPG, TIF, DOCX, PUB, EPS, PNG or AI

File Setup
Creativity shouldn’t have limits, but there are some file setup guidelines that should be observed when preparing your file for print.
Safe Area
Text and other design elements that you don’t want to get trimmed in final production should stay within this area. The safe area is minimally 1/8″ from the Trim Line.
Trim Line
This is where the finished product will be cut for its final size.
Bleed Area
This is the area that is going to be cut off in final production. Make sure this area is filled with background image and/or color so there is no white space left when it is trimmed.